빠른시작 / SDK
https://developers.docusign.com/docs/esign-rest-api/quickstart/overview/
Quickstart overview
Learn about what the DocuSign Quickstart enables you to do, how to use it, and how it differs from other DocuSign examples.
developers.docusign.com
빠른 시작 가이드입니다.
조건이 PHP8.0이상이라고 해서 저는 빠른 시작을 하지 못했지만
버전이 된다면 편할 것 같습니다.
https://developers.docusign.com/docs/esign-rest-api/sdks/php/setup-and-configuration/
PHP SDK setup and configuration
developers.docusign.com
PHP 7.4이상 버전이라면 SDK를 통해 Docusign의 REST API를 사용할 수 있습니다.

https://github.com/docusign/docusign-esign-php-client
GitHub - docusign/docusign-esign-php-client: The Official DocuSign PHP Client Library used to interact with the eSign REST API.
The Official DocuSign PHP Client Library used to interact with the eSign REST API. Send, sign, and approve documents using this client. - GitHub - docusign/docusign-esign-php-client: The Official D...
github.com
방법은 위 GitHub사이트에서 다운로드 하는 방법과

composer를 사용하는 방법이 있는데 가능하다면 composer를 이용하는 방법을 추천드립니다.
Curl로 사용하다가 제공된 API를 사용하니 코드도 보기 좋습니다!
인증 - OAuth 유형

왜냐하면... 잘 몰라서 그런지 JWT Grant를 사용이 도저히 안됐습니다...
그리고 잘 읽어봐야 삽질을 안 했을텐데
JWT를 제외한 방법은 사용자가 전자 서명을 해야할 때 Docusign에 로그인을 해야합니다!
JWT OAuth 2.0 인증
그럼 공식 문서와 영상을 보고 만들어 보겠습니다.
https://developers.docusign.com/platform/auth/oauth2-requirements-migration/
OAuth 2.0 requirements and migration
Describes the steps and considerations needed to migrate from legacy authentication to OAuth
developers.docusign.com
저는 인증 방법중에서 JWT Grant 방법중에 OAuth 2.0 요구사항 및 마이그레이션 방법을 사용했습니다.

키들을 입력해주고, 해당앱 옆의 설정-> 편집 -> RSA 키 생성 후 메모장 같은데에 복사해서 만들면 됩니다.
Private 부분만 저장하면 되는 것 같습니다.
https://support.docusign.com/s/document-item?language=en_US&rsc_301=&_gl=1*17wkqxf*_gcl_au*NTU4NDU2MzEzLjE2OTQwNDU4MzY.*_ga*MTM3MjA2Mzk1MC4xNjk0MDQ1ODM3*_ga_1TZ7S9D6BQ*MTY5NDU4MjY4Ny4yMi4xLjE2OTQ1ODY2MDcuNjAuMC4w&_ga=2.98339289.790982192.1694391136-1372063950.1694045837&bundleId=rrf1583359212854&topicId=gso1583359141256_1.html&_LANG=enus
scope 중에서 impersonation을 사용하기 위해 도메인 소유권도 증명 합니다
<?php
require("./vendor/autoload.php");	// 패키지를 자동으로 사용

// DocuSign API 엔드포인트 및 인증 정보 설정
$base_path = "https://demo.docusign.net/restapi/";	// 현재는 데모버전

$rsaPrivateKey = file_get_contents("./private.key");	// Docusign 사이트-> 앱 및 키 -> 편집 -> RSA 키
$integrationKey = "";	// Docusign 사이트-> 앱 및 키 -> 통합키
$impersonatedUserId = "";	// Docusign 사이트-> 앱 및 키 -> 사용자ID
$scope = "signature impersonation";	// impersonation = 도메인 소유권 증명 필요
?>
그럼 필요한 값들을 먼저 변수에 설정해주겠습니다.
try {
  $apiClient->getOAuth()->setOAuthBasePath("account-d.docusign.com");
  $response = $apiClient->requestJWTUserToken($integrationKey, $impersonatedUserId, $rsaPrivateKey, $scope, 60);
} catch (\Throwable $th) {
  var_dump($th);
  if (strpos($th->getMessage(), "consent_required") !== false) {
    $authorizationURL = 'https://account-d.docusign.com/oauth/auth?' . http_build_query([
      'scope' => $scope,
      'redirect_uri' => 'Your redirect url',
      'client_id' => $integrationKey,
      'response_type' => 'code'
    ]);

    echo 'Please visit the following link to grant consent authorization';
    echo "\n\n";
    echo $authorizationURL;
    exit();
  }
}
공식 영상에 따라 JWT토큰을 만들어 줍니다.
Access token / Account Id
if (isset($response)) {
  $access_token = $response[0]['access_token'];

  $info = $apiClient->getUserInfo($access_token);  // 유저 정보
  $account_id = $info[0]['accounts'][0]['account_id'];
}
이전 코드에서 requestJWTUserToken() 함수가 정상적으로 실행 됐으면
$response 변수를 통해서 access_token과 account_id를 얻을 수 있습니다.
(account_id는 설정 -> 앱 및 키 에서 확인할 수도 있습니다)
이제 access_token과 account_id가 있으니 서명 API를 호출할 수 있습니다
봉투 만들기
https://developers.docusign.com/docs/esign-rest-api/how-to/request-signature-in-app-embedded/
Request a Signature Through Your App
Demonstrates how to create an envelope and request a signature using embedded signing in your app or website.
developers.docusign.com
앱을 통해 서명 요청을 하는 방법으로 진행하겠습니다.
$requestBody = new EnvelopeDefinition([
        'status' => 'sent', // 서명 요청 상태 설정
        'email_subject' =>  'test',
        'subject' => 'test',
        'documents' => [
          [
              'documentBase64' => base64_encode(file_get_contents('./test.pdf')),
              'name' => 'test.pdf',
              'fileExtension' => 'pdf',
              'documentId' => '1', // 문서를 식별하는 고유한 ID
          ],
        ],
        'recipients' => [
            'signers' => [
                [
                'email'=>'email@email.com',
                'name'=>'name',
                'recipientId' => '1', // 수신자를 식별하는 고유한 ID
                'routingOrder' => '1',
                'clientUserId' => 'user id',
                'tabs' => [	// 넣을 탭들
                    'signHereTabs' => [
                        [
                          "stampType"=>"signature",
                          "name"=>"SignHere",
                          "tabLabel"=>"서명",
                          "scaleValue"=>"0.6538461",
                          "optional"=>"false",
                          "documentId"=>"1",
                          "recipientId"=>"58777518",
                          "pageNumber"=>"1",
                          "xPosition"=>"464",
                          "yPosition"=>"707",
                          "tabId"=>"1",
                          "templateLocked"=>"false",
                          "templateRequired"=>"false",
                          "tabType"=>"signhere"
                        ]
                    ],
                ]
              ],
            ],
        ],
    ]);
서명하는 탭 하나만 넣어서 만들어 보겠습니다.
나중에 원하는 위치에 탭을 넣기 위해
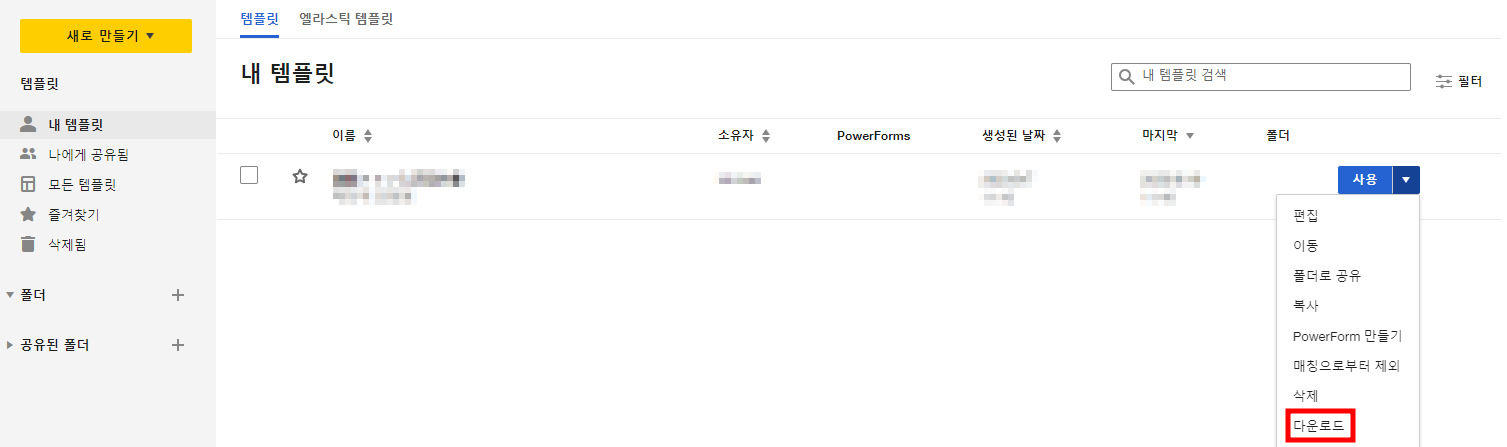
사이트에서 pdf를 사용해 템플릿이나 봉투를 만들고 다운로드를 하면 json파일로 다운로드 되는데,
만든 서명의 탭 정보를 쉽게 얻을 수 있습니다.
$config = new Configuration();
$config->setHost($base_path);
$config->addDefaultHeader('Authorization', 'Bearer ' . $access_token); // Access Token 추가
$apiClient = new ApiClient($config);

// 봉투 만들기 API
$envelopesApi = new EnvelopesApi($apiClient);
try {
    $results = $envelopesApi->createEnvelope($account_id, $requestBody);
    $envelopeId = $results->getEnvelopeId();
} catch (\Throwable $th) {
    var_dump($th);
}
access_token을 사용해서 API 요청을 해 봉투(envelopes)를 만듭니다.
echo var_dump($envelopeId);요청이 제대로 작동하고 envelopeId를 출력해보면 새로 요청할 때마다 봉투의ID 값이 계속 바뀌는걸 볼 수 있습니다.
서명 보기(수신자 보기)
// 수신자 보기 정의
try {
    $recipientViewRequest = new RecipientViewRequest([
        'return_url' => '서명이 성공하면 이동할 url',
        'authentication_method' => 'none',
        'email'=>'email@email.com',	// 봉투 만들때 설정한 수신자와 동일!!
        'user_name' => 'name',	// 봉투 만들때 설정한 수신자와 동일!!
        'client_user_id' => 'user id',	// 봉투 만들때 설정한 수신자와 동일!!
    ]);
    $recipientView = $envelopesApi->createRecipientView($account_id, $envelopeId, $recipientViewRequest);
    header("Location: " . $recipientView->getUrl());
} catch (\Throwable $th) {
    var_dump($th);
}
요청에 성공한 후 $recipientView->getUrl();를 사용하면 서명할 수 있는 Url이 나옵니다.
요청 후 바로 사용자가 서명할 수 있게 하려면 위 코드처럼 header("Location: ",url)을 사용합니다.
요청~서명 전체 코드
<?php
require("./vendor/autoload.php");	// 패키지를 자동으로 사용

use DocuSign\eSign\Api\EnvelopesApi;
use DocuSign\eSign\Client\ApiClient;
use DocuSign\eSign\Configuration;
use DocuSign\eSign\Model\EnvelopeDefinition;
use DocuSign\eSign\Model\RecipientViewRequest;

// DocuSign API 엔드포인트 및 인증 정보 설정
$base_path = "https://demo.docusign.net/restapi/";	// 현재는 데모버전

$rsaPrivateKey = file_get_contents("./private.key");	// Docusign 사이트-> 앱 및 키 -> 편집 -> RSA 키
$integrationKey = "";	// Docusign 사이트-> 앱 및 키 -> 통합키
$impersonatedUserId = "";	// Docusign 사이트-> 앱 및 키 -> 사용자ID
$scope = "signature impersonation";	// impersonation = 도메인 소유권 증명 필요

try {
  $apiClient->getOAuth()->setOAuthBasePath("account-d.docusign.com");
  $response = $apiClient->requestJWTUserToken($integrationKey, $impersonatedUserId, $rsaPrivateKey, $scope, 60);
} catch (\Throwable $th) {
  var_dump($th);
  if (strpos($th->getMessage(), "consent_required") !== false) {
    $authorizationURL = 'https://account-d.docusign.com/oauth/auth?' . http_build_query([
      'scope' => $scope,
      'redirect_uri' => 'Your redirect url',
      'client_id' => $integrationKey,
      'response_type' => 'code'
    ]);

    echo 'Please visit the following link to grant consent authorization';
    echo "\n\n";
    echo $authorizationURL;
    exit();
  }
}

if (isset($response)) {
  $access_token = $response[0]['access_token'];

  $info = $apiClient->getUserInfo($access_token);  // 유저 정보
  $account_id = $info[0]['accounts'][0]['account_id'];

  $requestBody = new EnvelopeDefinition([
        'status' => 'sent', // 서명 요청 상태 설정
        'email_subject' =>  'test',
        'subject' => 'test',
        'documents' => [
          [
              'documentBase64' => base64_encode(file_get_contents('./test.pdf')),
              'name' => 'test.pdf',
              'fileExtension' => 'pdf',
              'documentId' => '1', // 문서를 식별하는 고유한 ID
          ],
        ],
        'recipients' => [
            'signers' => [
                [
                'email'=>'email@email.com',
                'name'=>'name',
                'recipientId' => '1', // 수신자를 식별하는 고유한 ID
                'routingOrder' => '1',
                'clientUserId' => 'user id',
                'tabs' => [	// 넣을 탭들
                    'signHereTabs' => [
                        [
                          "stampType"=>"signature",
                          "name"=>"SignHere",
                          "tabLabel"=>"서명",
                          "scaleValue"=>"0.6538461",
                          "optional"=>"false",
                          "documentId"=>"1",
                          "recipientId"=>"58777518",
                          "pageNumber"=>"1",
                          "xPosition"=>"464",
                          "yPosition"=>"707",
                          "tabId"=>"1",
                          "templateLocked"=>"false",
                          "templateRequired"=>"false",
                          "tabType"=>"signhere"
                        ]
                    ],
                ]
              ],
            ],
        ],
    ]);

  	$config = new Configuration();
    $config->setHost($base_path);
    $config->addDefaultHeader('Authorization', 'Bearer ' . $access_token); // Access Token 추가
    $apiClient = new ApiClient($config);

    // 봉투 만들기 API
    $envelopesApi = new EnvelopesApi($apiClient);
    try {
        $results = $envelopesApi->createEnvelope($account_id, $requestBody);
        $envelopeId = $results->getEnvelopeId();
    } catch (\Throwable $th) {
        var_dump($th);
    }

    // 수신자 보기 정의
    try {
        $recipientViewRequest = new RecipientViewRequest([
            'return_url' => '서명이 성공하면 이동할 url',
            'authentication_method' => 'none',
            'email'=>'email@email.com',	// 봉투 만들때 설정한 수신자와 동일!!
            'user_name' => 'name',	// 봉투 만들때 설정한 수신자와 동일!!
            'client_user_id' => 'user id',	// 봉투 만들때 설정한 수신자와 동일!!
        ]);
        $recipientView = $envelopesApi->createRecipientView($account_id, $envelopeId, $recipientViewRequest);
        header("Location: " . $recipientView->getUrl());
    } catch (\Throwable $th) {
        var_dump($th);
    }
}
하지만 이 방법은 로컬에도 같은 pdf가 있어야하고 문서를 변경하는데 번거로움이 있습니다.
그래서 템플릿을 가져오는 방법이 있습니다
템플릿으로 생성하기

먼저 사용할 템플릿을 만들고 ID를 확인합니다.
먼저 수신인 정하고 템플릿을 만든 후, 다시 편집 눌러서 수신인 삭제 후 저장하면 수신인 없이 템플릿이 만들어집니다.
use DocuSign\eSign\Model\SignHere;
use DocuSign\eSign\Model\TemplateRole;

...

$templateRole = new TemplateRole([
    'email' => 'email@email.com', // 수신자 이메일 주소
    'name' => 'name', // 수신자 이름
    'role_name' => 'signer', // 템플릿 내의 역할 이름
    'client_user_id' => 'user id',
    'tabs' => [
      'signHereTabs' => [
        new SignHere([
          "stamp_type" => "signature",
          "name" => "SignHere",
          "tab_Label" => "서명",
          "scale_Value" => "0.6538461",
          "optional" => "false",
          "document_id" => "1",
          "recipient_id" => "58777518",
          "page_number" => "1",
          "x_position" => "464",
          "y_position" => "707",
          "tab_id" => "1",
          "template_locked" => "false",
          "template_required" => "false",
          "tab_type" => "signhere"
        ]),
      ],
    ],
  ]);

  // 서명 요청 생성
  $requestBody = new EnvelopeDefinition([
    'template_id' => 'template id', // 사용할 템플릿 ID 설정
    'status' => 'sent', // 서명 요청 상태 설정 (보내기)
    'template_roles' => [$templateRole],
  ]);


  // 나머지 코드 동일
  $config = new Configuration();
  ...
  header("Location: " . $recipientView->getUrl());
  ...
위 코드처럼 acess_token을 받아온 이후
template_id와 template_roles를 정의해서 요청하면 됩니다.
마찬가지로 tabs는 Docusign 사이트에서 템플릿을 json파일로 다운로드 해서 볼 수 있습니다.
(코드 뒤져보다가 찾은 템플릿의 tabs 가져오기 요청을 했는데 원하는 값이 안나왔습니다...)
'PHP' 카테고리의 다른 글
| [PHP] AWS S3 업로드/다운로드 (1) | 2023.10.17 |
|---|---|
| PHP 짧은 태그 에러 (소스코드가 보여짐) (0) | 2023.04.03 |

